how to thiking 3d while drawing
If you accept ever wanted to build a game with JavaScript, you might have run across Three.js.
Three.js is a library that nosotros tin use to render 3D graphics in the browser. The whole matter is in JavaScript, and then with some logic you can add animation, interaction, or even turn it into a game.
In this tutorial, we will go through a very unproblematic example. Nosotros'll render a 3D box, and while doing and so we'll acquire the fundamentals of Three.js.
Iii.js uses WebGL under the hood to render 3D graphics. We could use apparently WebGL, only it's very complex and rather depression level. On the other paw, Three.js is like playing with Legos.
In this article, we'll get through how to identify a 3D object in a scene, set upwards the lighting and a photographic camera, and return the scene on a canvass. And then let's see how we can practise all this.
Ascertain the Scene Object
Offset, nosotros have to define a scene. This will be a container where nosotros place our 3D objects and lights. The scene object too has some properties, like the background color. Setting that is optional though. If we don't set it, the default will exist black.
import * every bit THREE from "three"; const scene = new THREE.Scene(); scene.background = new THREE.Color(0x000000); // Optional, black is default ... Geometry + Material = Mesh
So we add our 3D box to the scene as a mesh. A mesh is a combination of a geometry and a material.
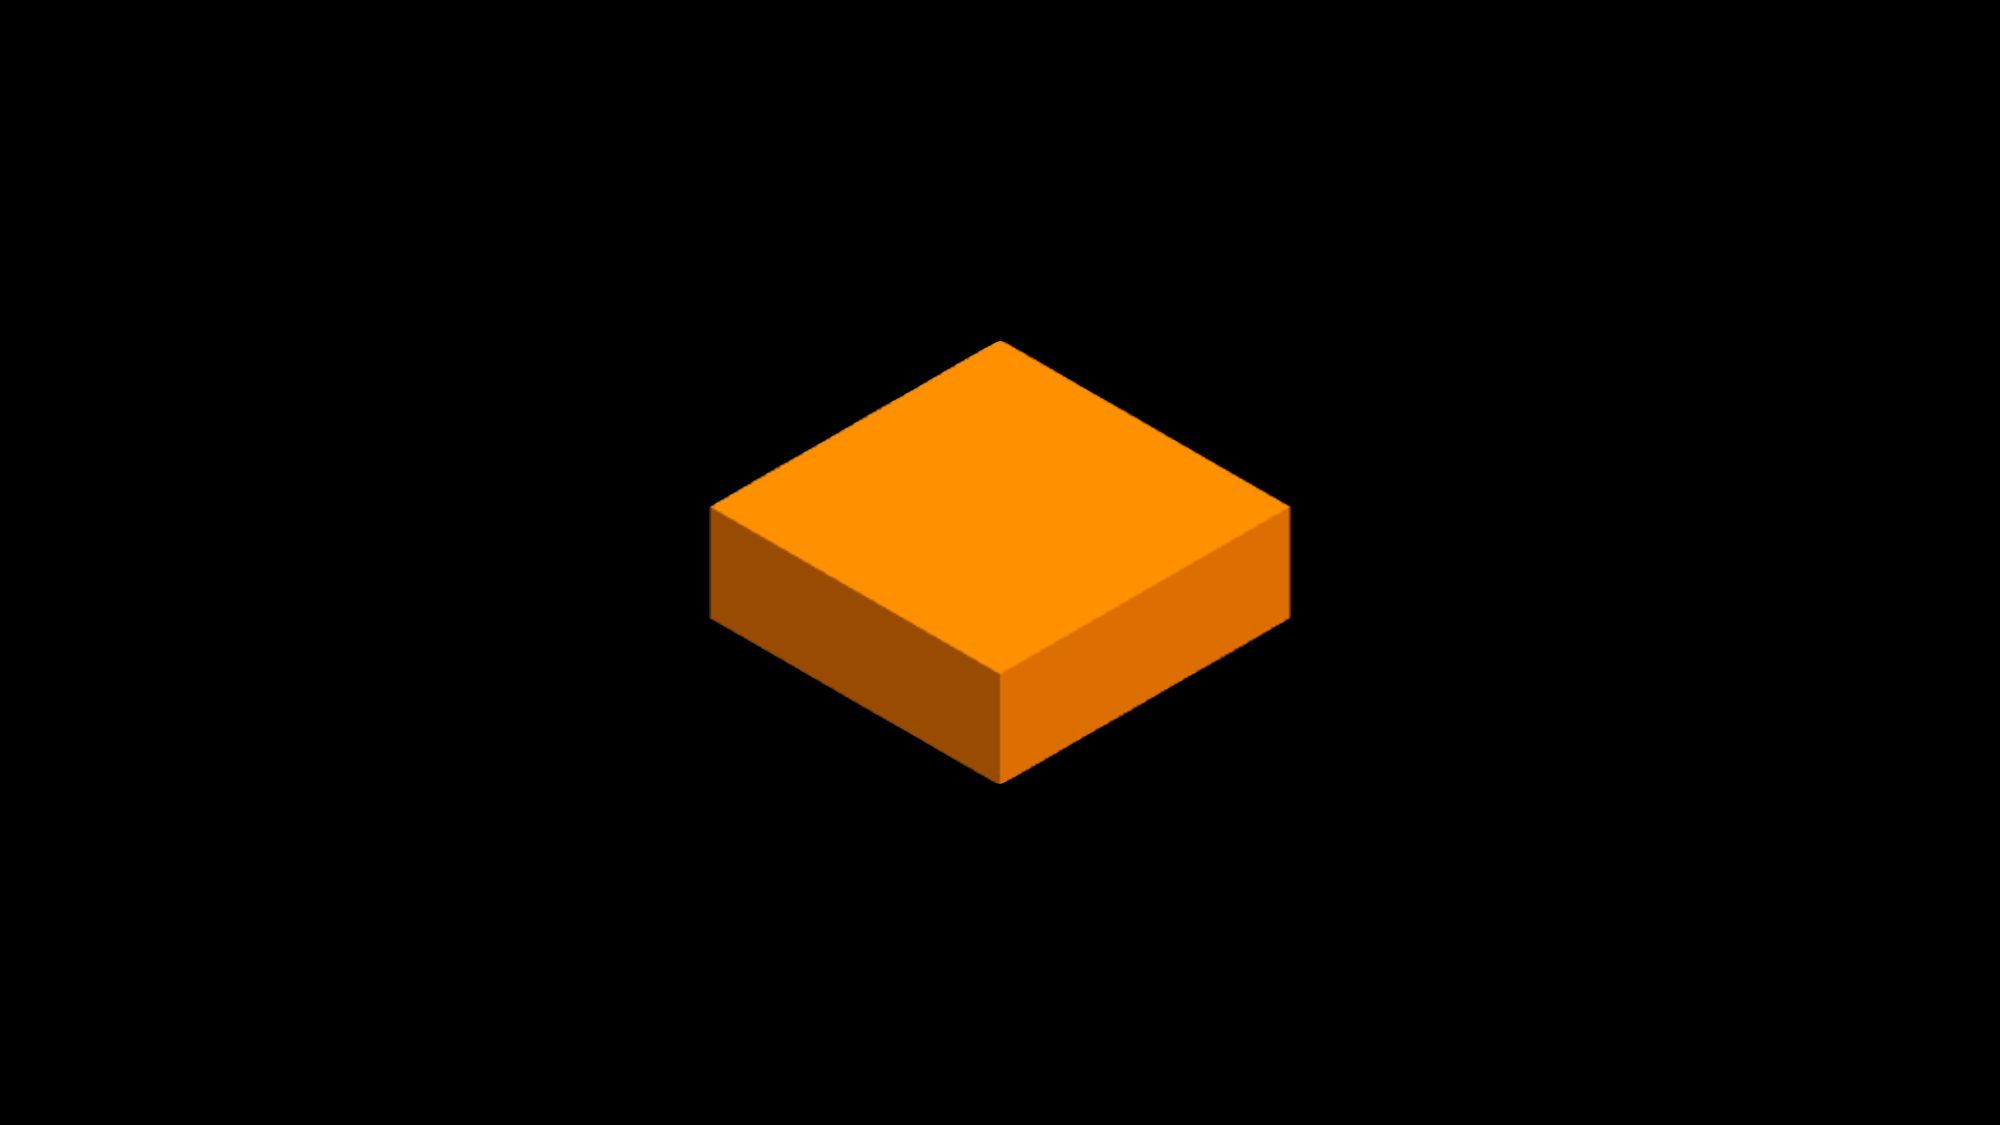
... // Add together a cube to the scene const geometry = new THREE.BoxGeometry(3, 1, 3); // width, height, depth const material = new THREE.MeshLambertMaterial({ color: 0xfb8e00 }); const mesh = new 3.Mesh(geometry, material); mesh.position.set(0, 0, 0); // Optional, 0,0,0 is the default scene.add(mesh); ... What is a Geometry?
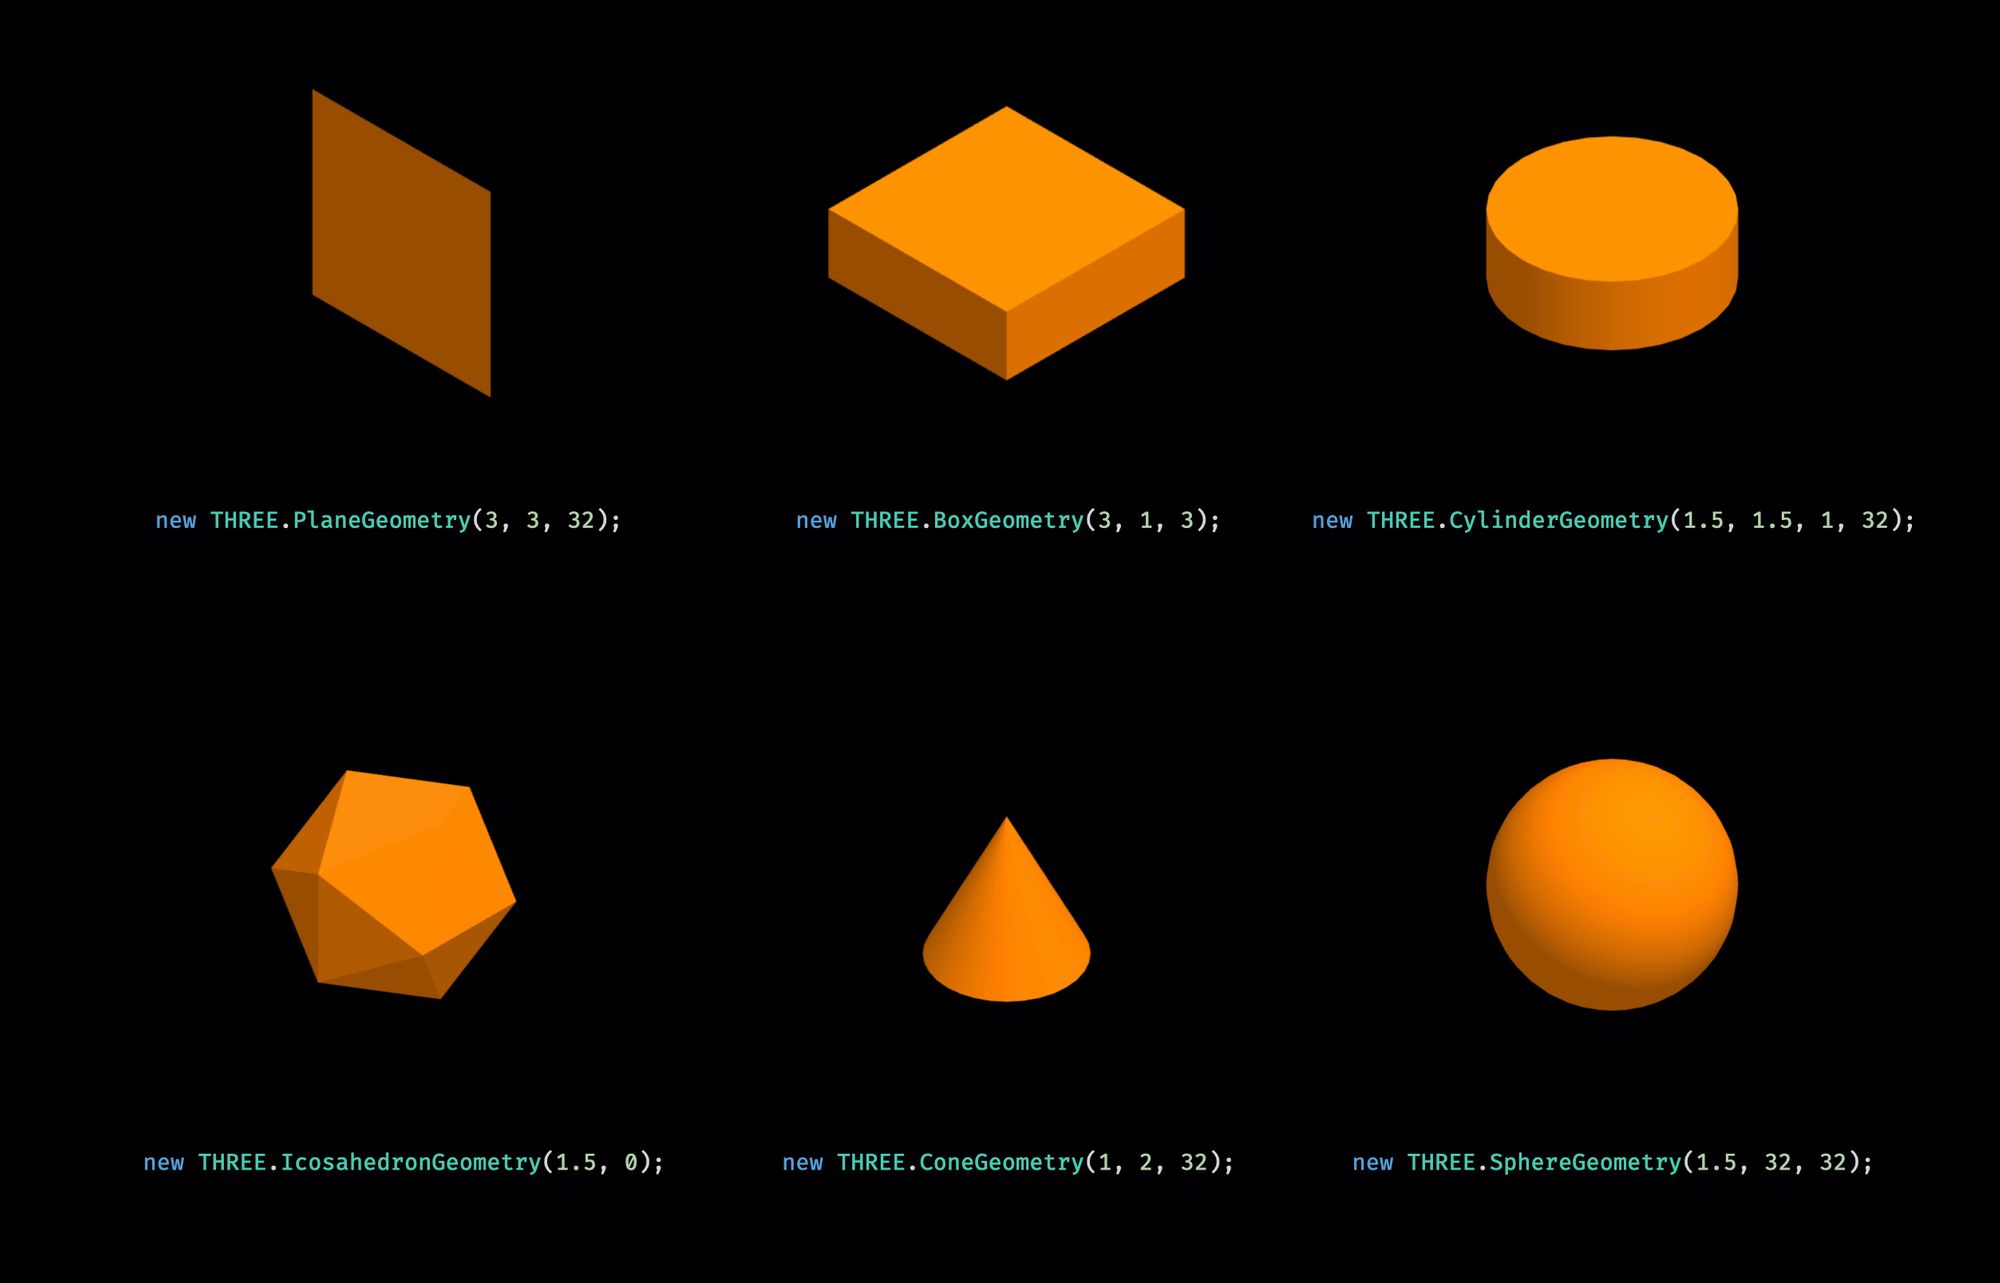
A geometry is a rendered shape that nosotros're edifice - like a box. A geometry tin be build from vertices or we can use a predefined i.
The BoxGeometry is the most basic predefined pick. We but take to prepare the width, pinnacle, and depth of the box and that's it.
Y'all might retrieve that we can't get far by defining boxes, but many games with minimalistic design use but a combination of boxes.
At that place are other predefined geometries besides. We tin hands define a aeroplane, a cylinder, a sphere, or even an icosahedron.
How to Work with Fabric
Then we define a material. A cloth describes the appearance of an object. Here we tin can define things like texture, color, or opacity.
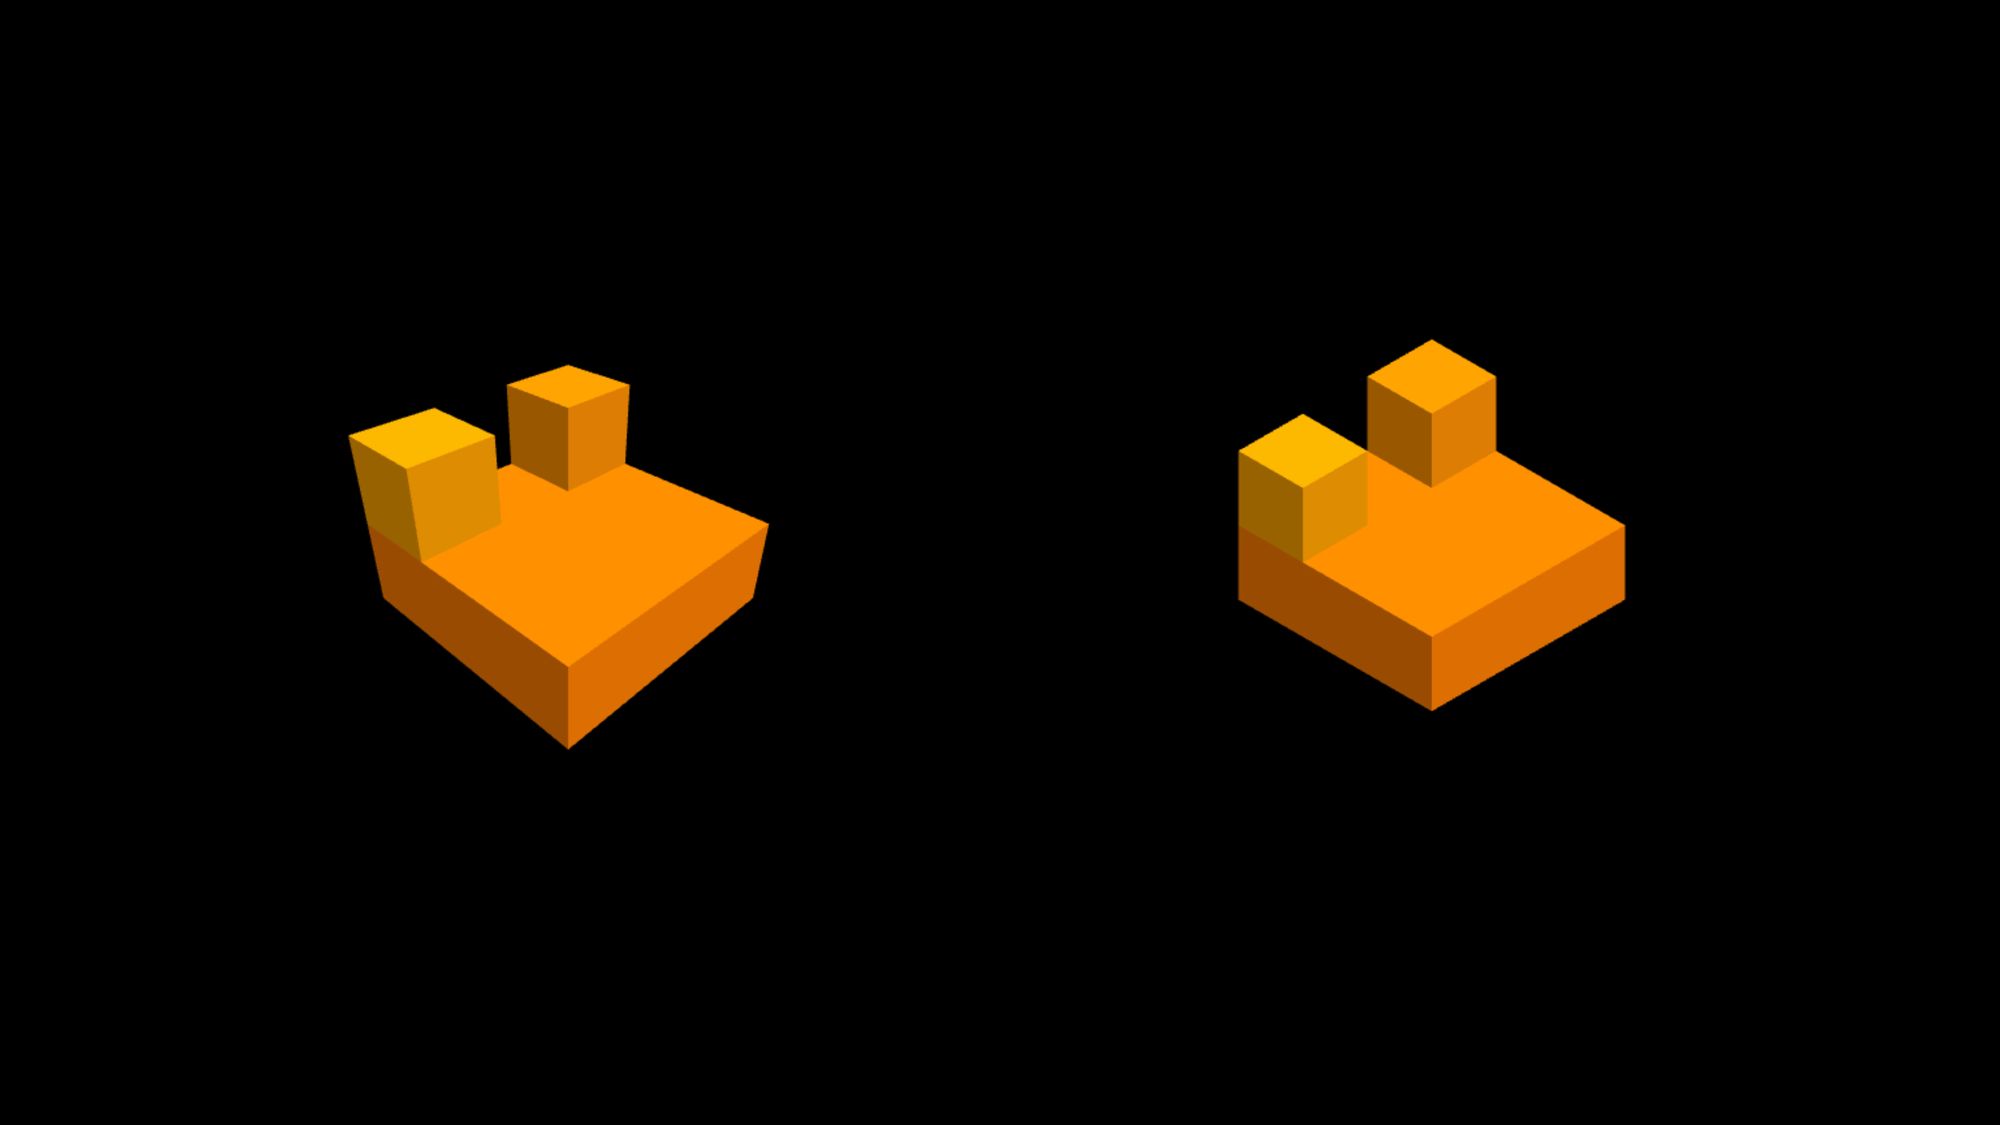
In this example nosotros are only going to set a color. In that location are still different options for materials. The chief deviation between most of them is how they react to light.
The simplest 1 is the MeshBasicMaterial. This material doesn't intendance about calorie-free at all, and each side will have the same color. Information technology might not be the best choice, though, every bit you tin't see the edges of the box.
The simplest material that cares about light is the MeshLambertMaterial. This volition calculate the color of each vertex, which is practically each side. But information technology doesn't become beyond that.
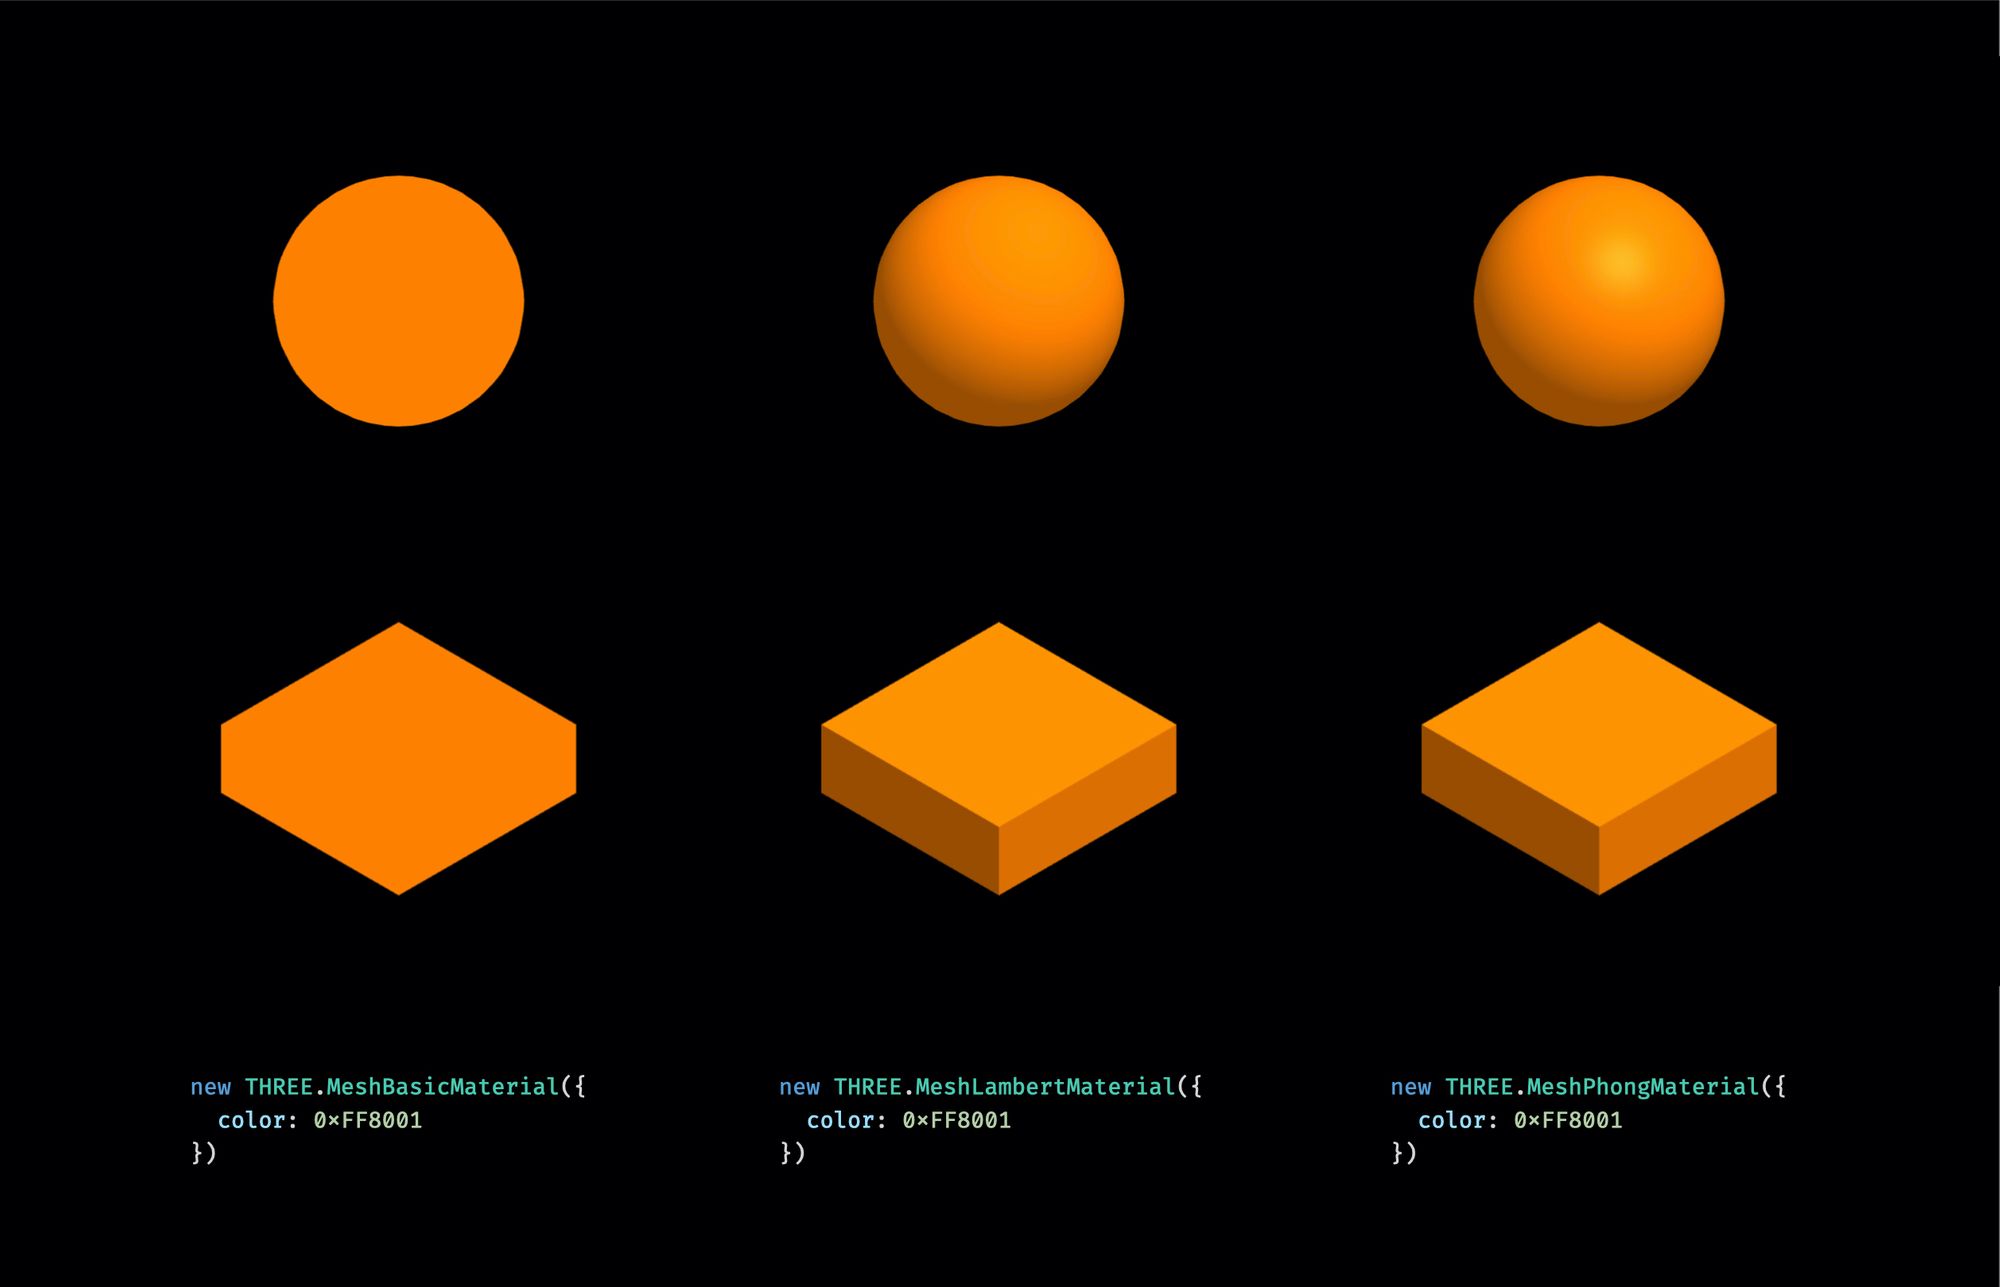
If you demand more precision, there are more advanced materials. The MeshPhongMaterial not only calculates the color past vertex but by each pixel. The color tin can change inside a side. This can help with realism but besides costs in operation.
Information technology besides depends on the calorie-free settings and the geometry if it has any existent effect. If nosotros render boxes and use directional light, the consequence won't modify that much. But if nosotros render a sphere, the difference is more than obvious.
How to Position a Mesh
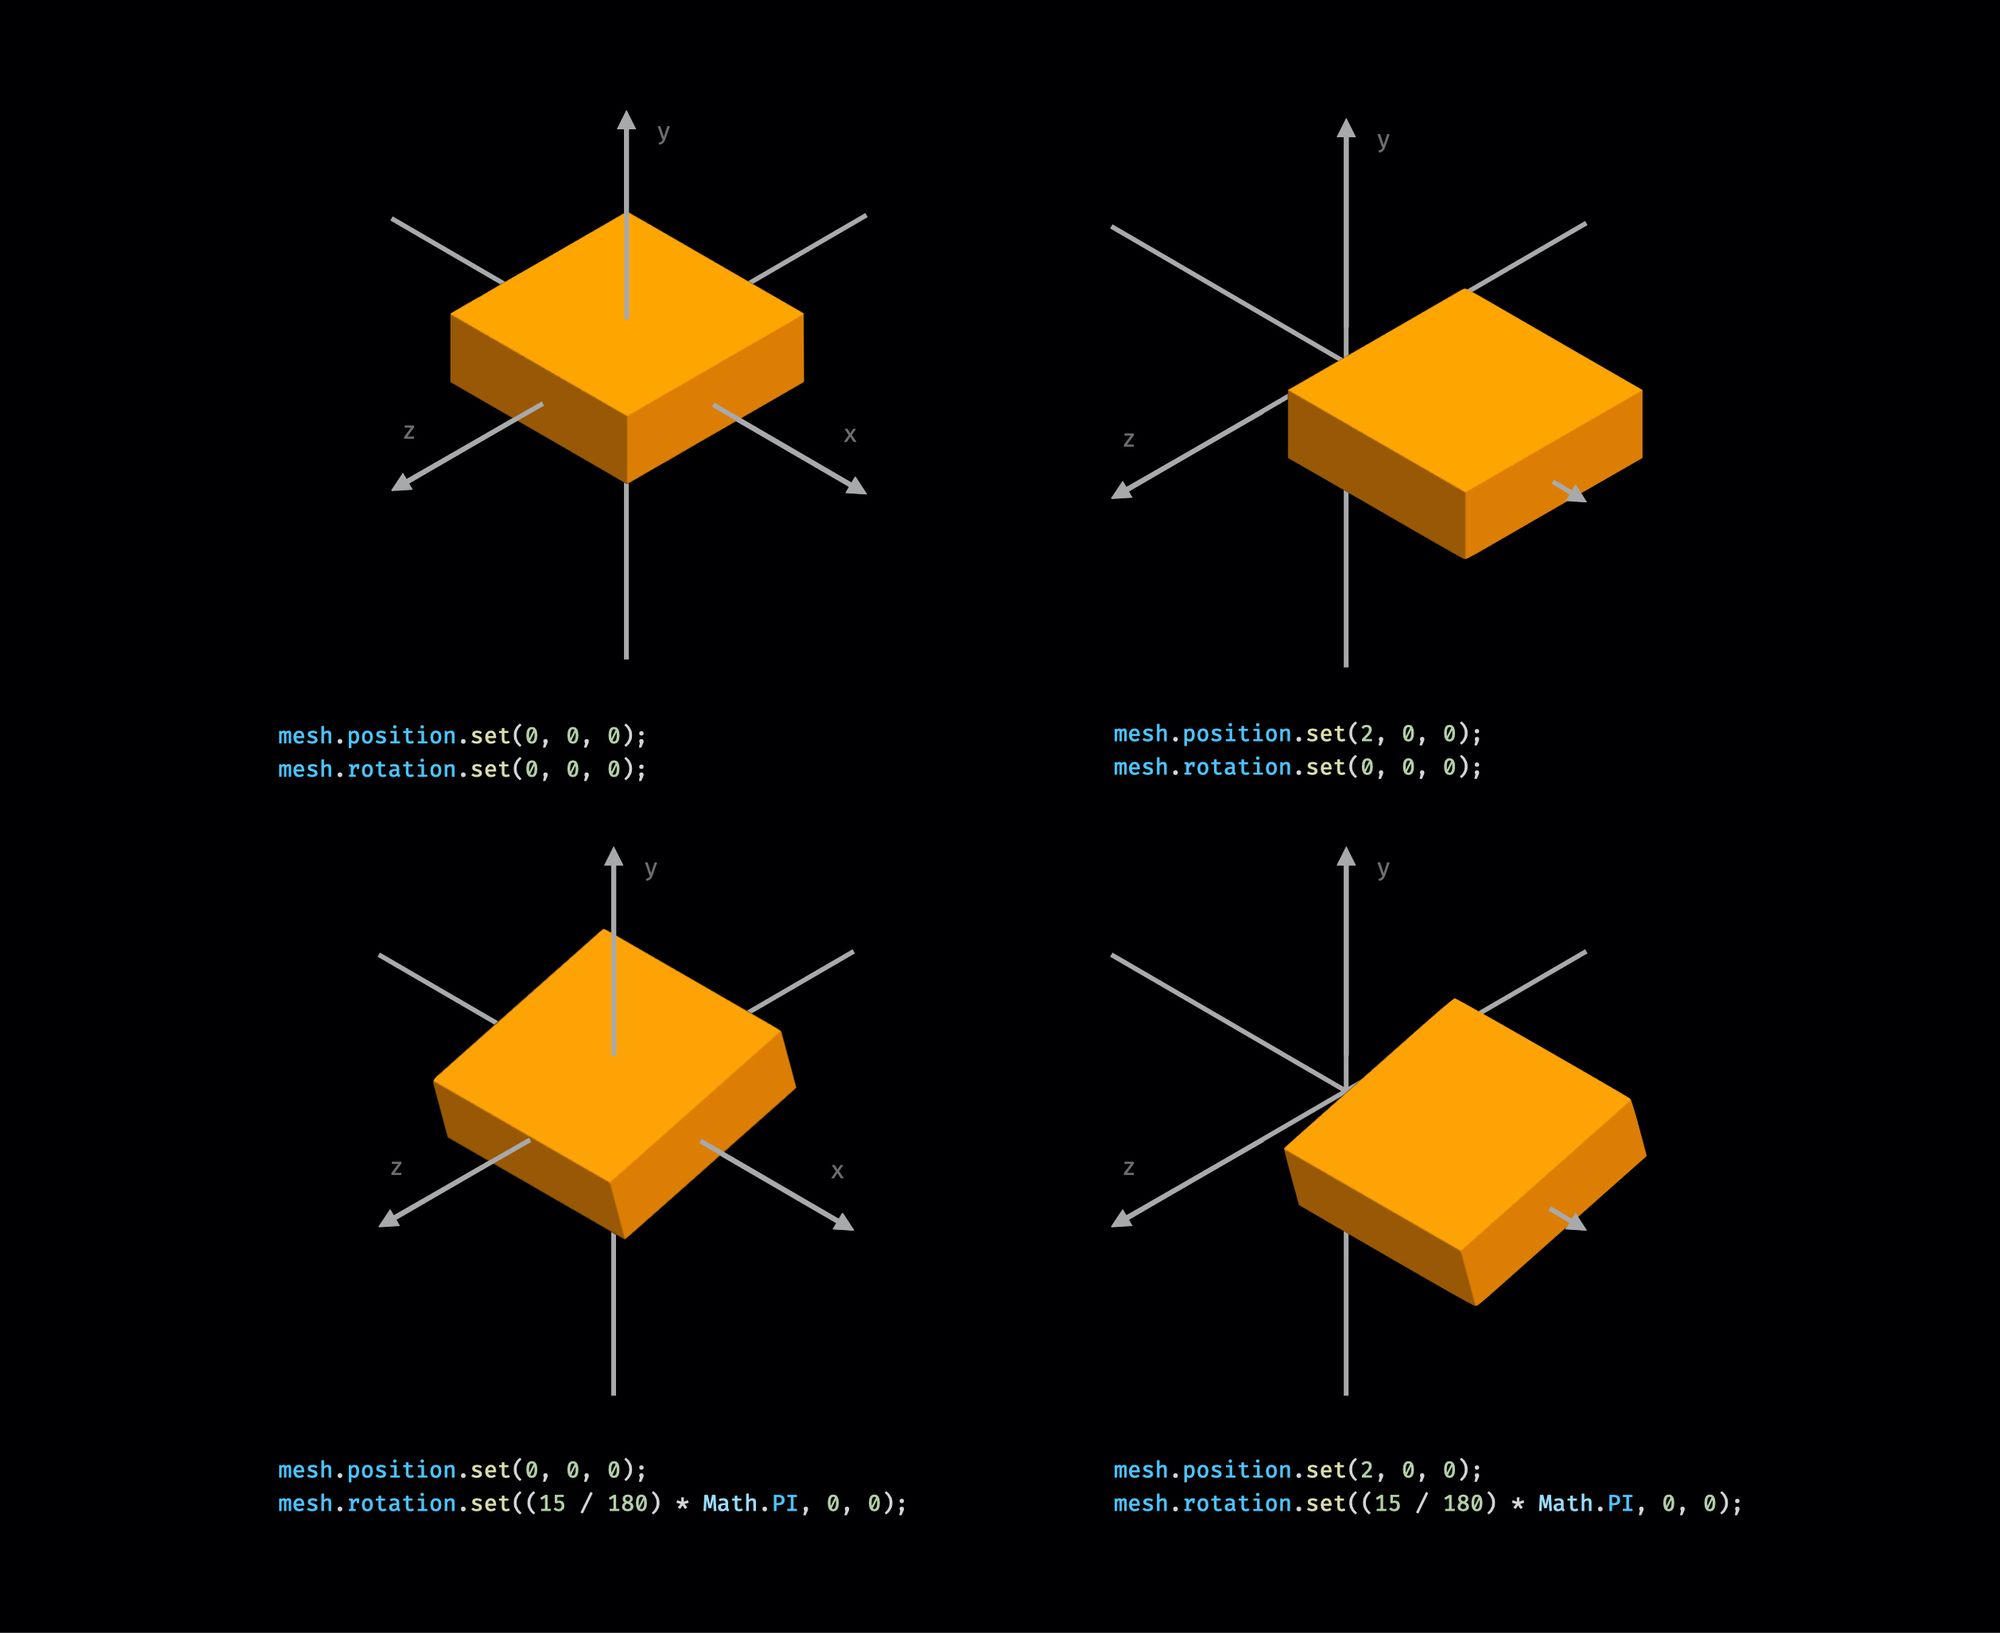
In one case nosotros have a mesh we tin also position it within the scene and set a rotation by each axis. Later on if we want to breathing objects in the 3D space we will mostly adjust these values.
For positioning we utilize the same units that we used for setting the size. It doesn't matter if you lot are using pocket-size numbers or big numbers, yous just need to be consistent in your own earth.
For the rotation we ready the values in radians. So if you have your values in degrees you have to split up them past 180° then multiply by PI.
How to Add Light
Then let's add lights. A mesh with basic textile doesn't need any light, as the mesh volition have the set colour regardless of the low-cal settings.
Just the Lambert cloth and Phong cloth require light. If there isn't any light, the mesh will remain in darkness.
... // Prepare lights const ambientLight = new THREE.AmbientLight(0xffffff, 0.6); scene.add(ambientLight); ... We'll add together 2 lights - an ambient light and a directional lite.
Starting time, we add together the ambient light. The ambient light is shining from every direction, giving a base colour for our geometry.
To set an ambience light nosotros fix a color and an intensity. The color is normally white, but you can set any color. The intensity is a number between 0 and 1. The two lights we define work in an accumulative way so in this case we desire the intensity to exist around 0.five for each.
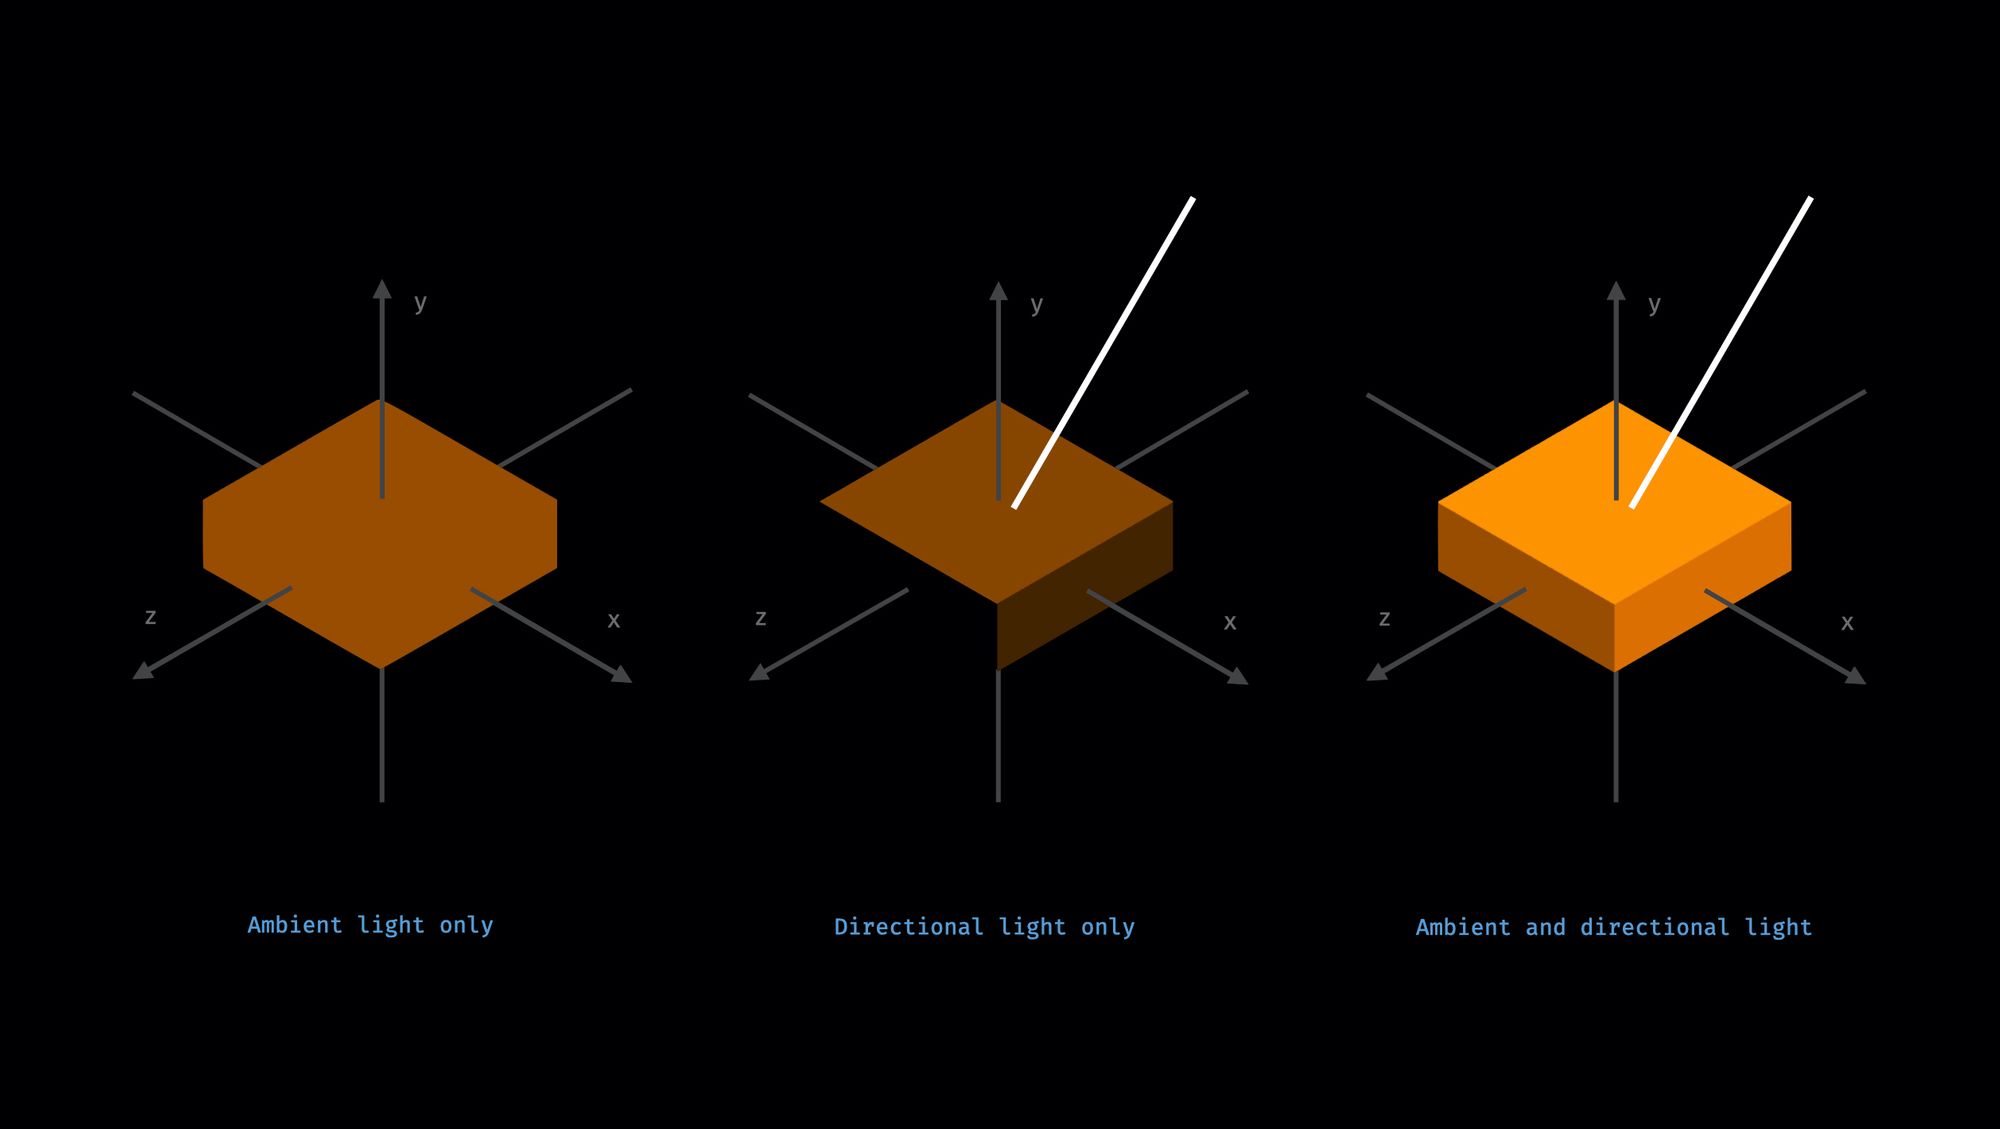
The directional light has a like setup, but it also has a position. The discussion position hither is a bit misleading, because information technology doesn't mean that the light is coming from an exact position.
The directional low-cal is shining from very far abroad with many parallel light rays all having a fixed angle. But instead of defining angles, we ascertain the management of a single light ray.
In this case, it shines from the direction of the 10,20,0 position towards the 0,0,0 coordinate. But of course, the directional calorie-free is non but i light ray, merely an infinite amount of parallel rays.
Call back of it equally the sunday. On a smaller scale, light rays of the sun as well come up down in parallel, and the sun's position isn't what matters but rather its direction.
And that'due south what the directional light is doing. It shines on everything with parallel light rays from very far away.
... const dirLight = new THREE.DirectionalLight(0xffffff, 0.6); dirLight.position.set(10, 20, 0); // x, y, z scene.add(dirLight); ... Hither we set up the position of the light to exist from above (with the Y value) and shift it a bit forth the 10-axis every bit well. The Y-axis has the highest value. This means that the summit of the box receives the most calorie-free and it will be the shiniest side of the box.
The lite is also moved a fleck along the X-centrality, so the right side of the box will also receive some light, but less.
And because nosotros don't move the light position forth the Z-axis, the front end side of the box will not receive whatever light from this source. If at that place wasn't an ambience lite, the front side would remain in darkness.
There are other low-cal types also. The PointLight, for instance, tin can be used to simulate light bulbs. It has a fixed position and it emits light in every direction. And the SpotLight can be used to simulate the spotlight of a car. It emits light from a single point into a direction along a cone.
How to Gear up up the Photographic camera
So far, we take created a mesh with geometry and material. And nosotros have also fix lights and added to the scene. We still need a camera to define how we look at this scene.
In that location are ii options here: perspective cameras and orthographic cameras.
Video games mostly use perspective cameras, because how they work is similar to how you see things in existent life. Things that are farther away appear to be smaller and things that are right in front end of you announced bigger.
With orthographic projections, things will have the same size no matter how far they are from the camera. Orthographic cameras have a more minimal, geometric wait. They don't distort the geometries - the parallel lines will appear in parallel.
For both cameras, we have to define a view frustum. This is the region in the 3D space that is going to be projected to the screen. Anything outside of this region won't appear on the screen. This is because information technology is either as well close or too far away, or because the camera isn't pointed towards it.
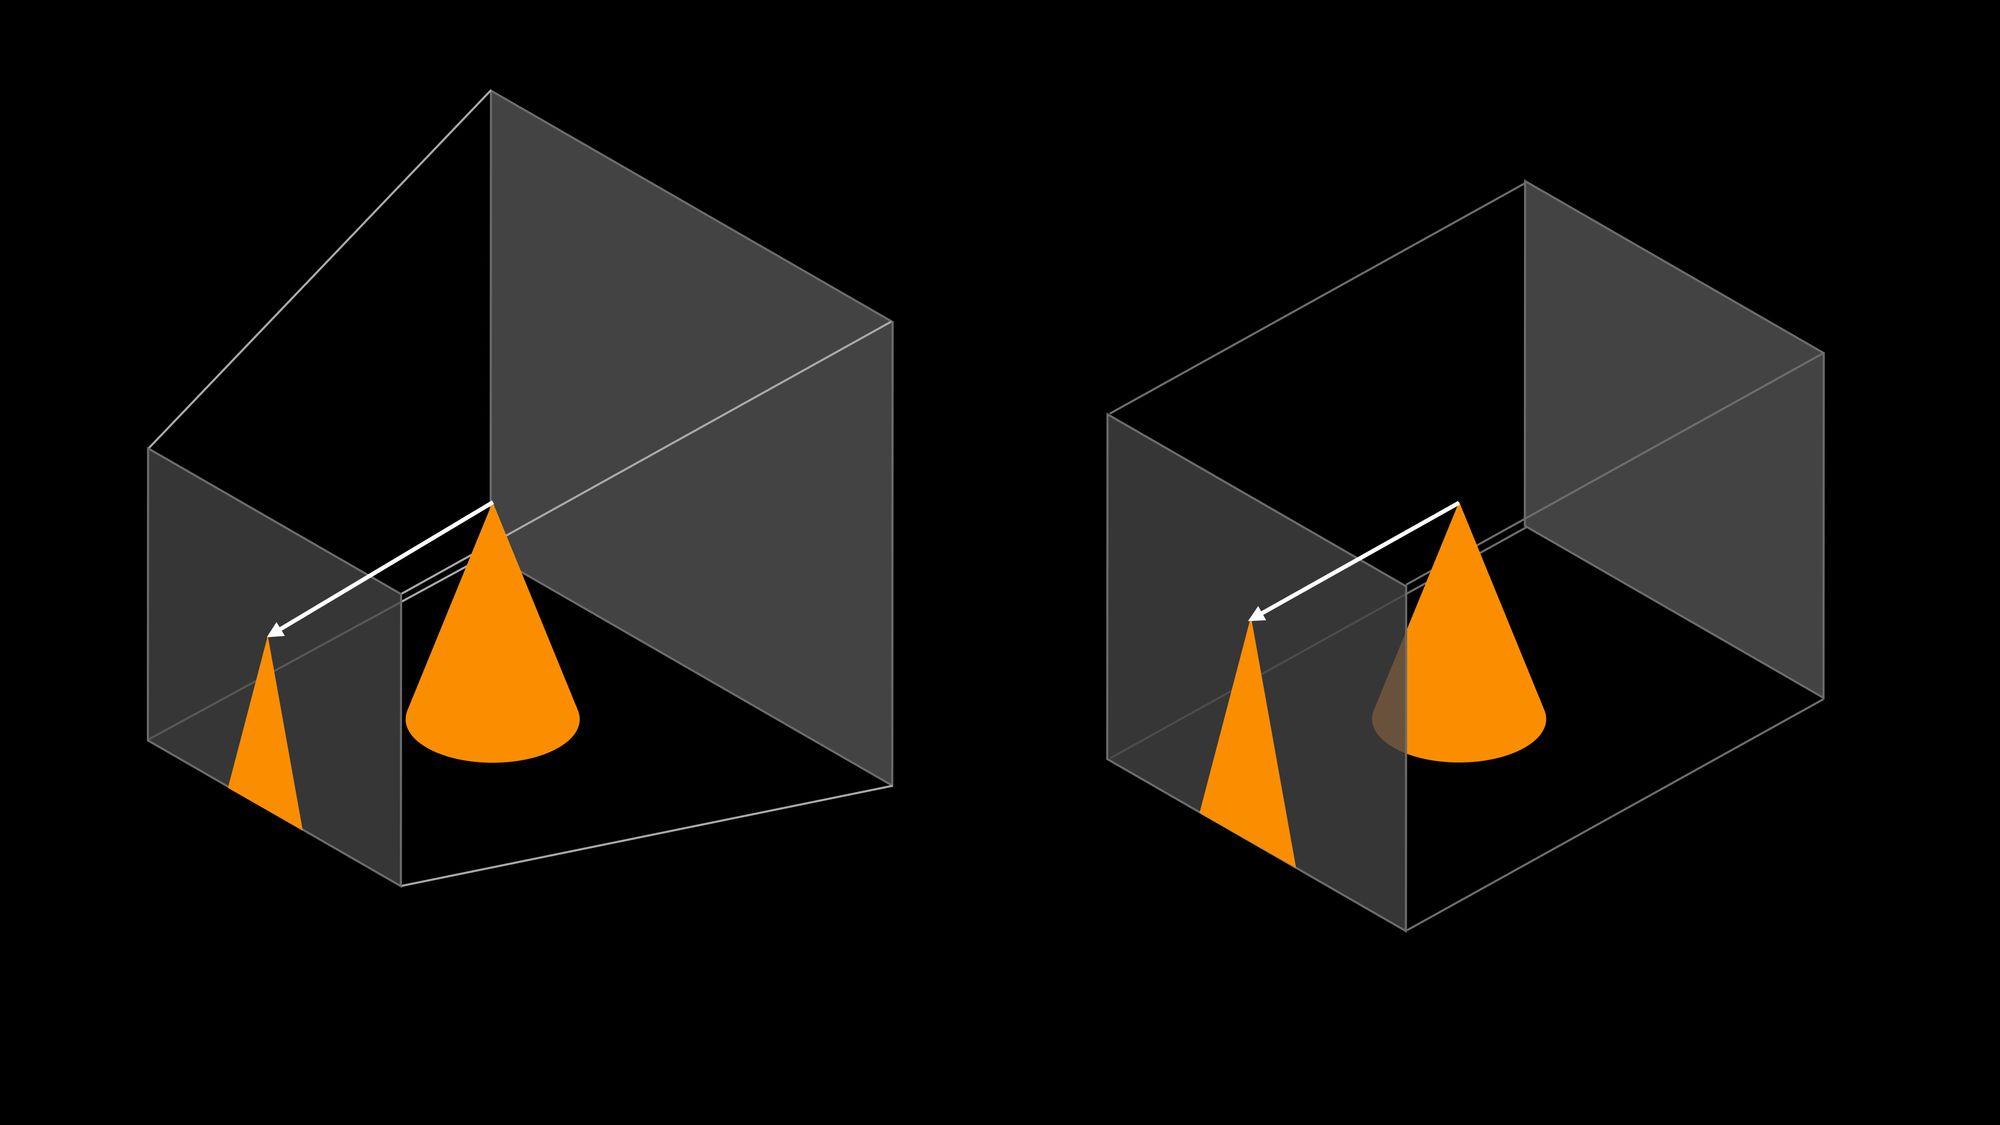
With perspective project, everything inside the view frustum is projected towards the viewpoint with a directly line. Things further away from the camera appear smaller on the screen, because from the viewpoint yous can run into them under a smaller angle.
... // Perspective camera const aspect = window.innerWidth / window.innerHeight; const photographic camera = new 3.PerspectiveCamera( 45, // field of view in degrees aspect, // attribute ratio 1, // well-nigh plane 100 // far plane ); ... To define a perspective camera, you lot need to set up a field of view, which is the vertical angle from the viewpoint. Then you define an aspect ratio of the width and the meridian of the frame. If you fill the whole browser window and you want to keep its aspect ratio, then this is how you can do information technology.
Then the concluding 2 parameters define how far the virtually and far planes are from the viewpoint. Things that are likewise close to the camera will be ignored, and things that are too far abroad will exist ignored likewise.
... // Orthographic photographic camera const width = 10; const top = width * (window.innerHeight / window.innerWidth); const camera = new THREE.OrthographicCamera( width / -ii, // left width / 2, // right height / 2, // summit peak / -2, // bottom 1, // near 100 // far ); ... Then there's the orthographic camera. Hither we are non projecting things towards a single signal but towards a surface. Each projection line is in parallel. That'due south why it doesn't affair how far objects are from the camera, and that'south why it doesn't distort geometries.
For orthographic cameras, we have to define how far each plane is from the viewpoint. The left airplane is therefor five units to the left, and the correct airplane is five units to the right, and and so on.
... camera.position.set(4, 4, four); camera.lookAt(0, 0, 0); ... Regardless of which camera are we using, we also need to position it and set it in a direction. If we are using an orthographic camera the actual numbers here don't thing that much. The objects will appear the same size no matter how far away they are from the photographic camera. What matters, though, is their proportion.
Through this whole tutorial, nosotros saw all the examples through the aforementioned camera. This photographic camera was moved past the same unit forth every axis and it looks towards the 0,0,0 coordinate. Positioning an orthographic camera is like positioning a directional light. It's non the actual position that matters, but its direction.
How to Render the Scene
So we managed to put together the scene and a photographic camera. Now only the final piece is missing that renders the image into our browser.
We need to define a WebGLRenderer. This is the piece that is capable of rendering the actual image into an HTML canvas when nosotros provide a scene and a photographic camera. This is also where we can set the actual size of this canvas – the width and height of the canvas in pixels as it should appear in the browser.
import * as Three from "three"; // Scene const scene = new THREE.Scene(); // Add together a cube to the scene const geometry = new THREE.BoxGeometry(3, 1, 3); // width, peak, depth const material = new Iii.MeshLambertMaterial({ colour: 0xfb8e00 }); const mesh = new THREE.Mesh(geometry, material); mesh.position.set(0, 0, 0); scene.add(mesh); // Set lights const ambientLight = new Iii.AmbientLight(0xffffff, 0.six); scene.add(ambientLight); const directionalLight = new Iii.DirectionalLight(0xffffff, 0.6); directionalLight.position.set(10, twenty, 0); // x, y, z scene.add(directionalLight); // Photographic camera const width = x; const height = width * (window.innerHeight / window.innerWidth); const camera = new Three.OrthographicCamera( width / -2, // left width / 2, // right height / two, // top pinnacle / -2, // bottom 1, // virtually 100 // far ); camera.position.set(four, iv, 4); camera.lookAt(0, 0, 0); // Renderer const renderer = new THREE.WebGLRenderer({ antialias: truthful }); renderer.setSize(window.innerWidth, window.innerHeight); renderer.render(scene, camera); // Add it to HTML certificate.trunk.appendChild(renderer.domElement); And finally, the last line here adds this rendered sheet to our HTML certificate. And that's all you lot demand to render a box. Information technology might seem a picayune too much for only a single box, but most of these things nosotros only accept to set in one case.
If y'all want to move forward with this project, and then check out my YouTube video on how to plow this into a simple game. In the video, we create a stack building game. We add game logic, event handlers and animation, and even some physics with Cannon.js.
If you accept any feedback or questions on this tutorial, experience gratuitous to Tweet me @HunorBorbely or exit a comment on YouTube.
Learn to code for free. freeCodeCamp'southward open up source curriculum has helped more 40,000 people get jobs equally developers. Get started
Source: https://www.freecodecamp.org/news/render-3d-objects-in-browser-drawing-a-box-with-threejs/
Post a Comment for "how to thiking 3d while drawing"